I could definitely set the stepping values on the inputs, just wasn't sure what steps to use. I believe the default is 1. I did set the minimum attribute to 0, so maybe that is what you ran into.
And I think I wanted to go from 10 to 20 on that first one but incrementing past 10 went straight to zero and then kind of stayed there.
In the sidebar or in settings and which field? I just looked and clicking those arrows on my end didn't reproduce this in either. What browser?
Sidebar, Safari 11.1
I'll do some more testing tomorrow. I'm here at work now, for what it's worth.
Nearly fixed...
Send: G90
Recv: ok
Send: G1 Z10 F1200
Recv: ok
Send: G1 X2 Y-11 F4800
Recv: ok
Send: G1 Z0.1 F1200
Recv: ok
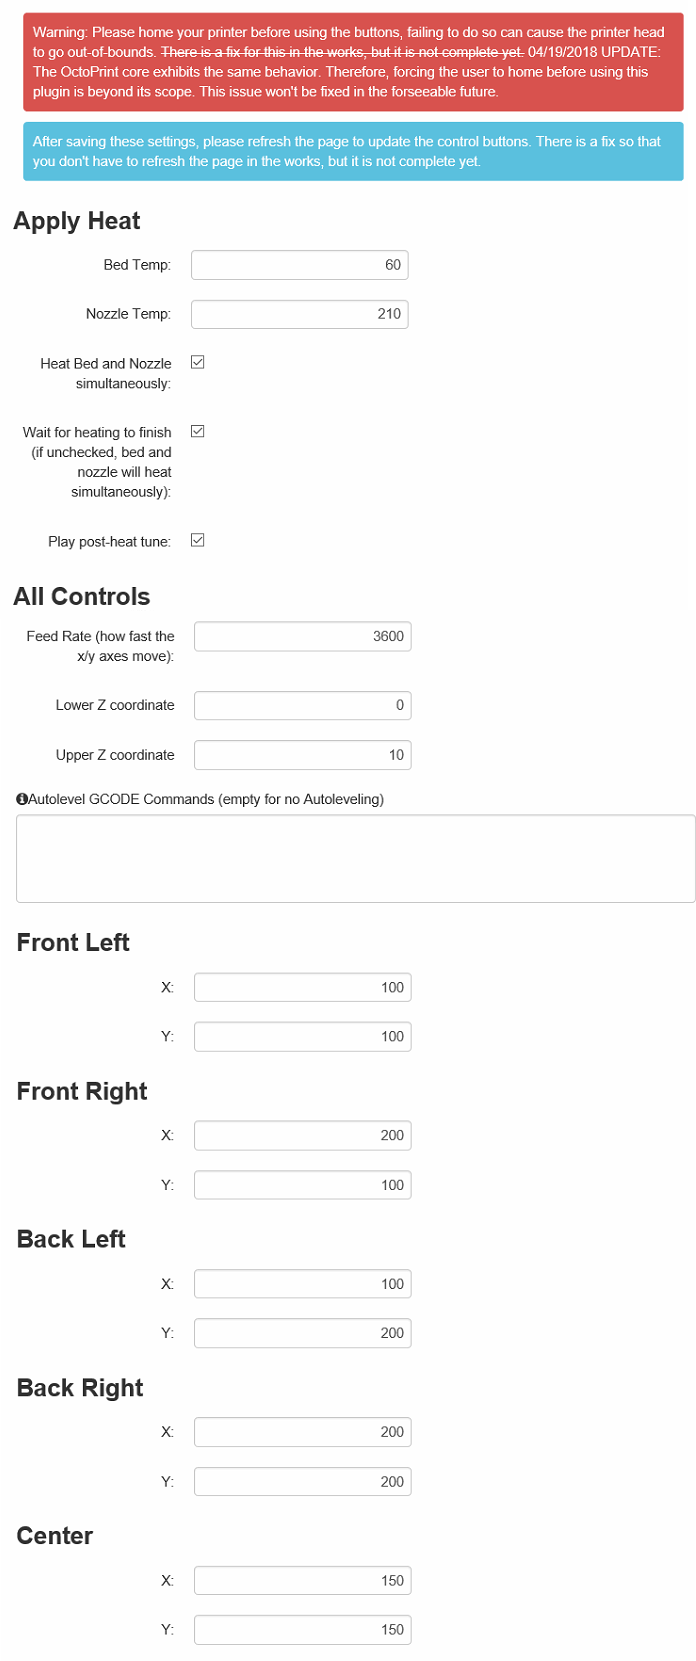
My bed settings are like this:
X Min = -13 & Max = 185
Y Min = -26 & Max = 184
The bed itself has 0,0 in the bottom left hand corner - it's just that my end-stops are miles away because I've upgraded some bits & left others as stock.
At the moment, your code adds your X/Y Offset to the X Min & the Y Min, so when I set X/Y Offset to 15 (to avoid my bulldog clips) your code gave X as (-13) + (15) = 2 & Y as (-26) + (15) = 11 which rammed it into the bulldog clip. My bed still starts from 0,0 - it's just the end-stops that are far away. However, it does stop at X Max & Y Max.
Perhaps you could assume that beds start from 0,0 & finish at X_Max,Y_Max ?
The next move does this:
Send: G90
Recv: ok
Send: G1 Z10 F1200
Recv: ok
Send: G1 X170 Y169 F4800
Recv: ok
Send: G1 Z0.1 F1200
Which does exactly what it's supposed to, so it looks like (X_Max) - (X/Y Offset) & (Y_Max) - (X/Y Offset) give the right figures for us to use.
Moves 3 & 4 worked exactly as expected, given what we've discovered above.
Send: G1 X170 Y-11 F4800
...
Send: G1 X2 Y169 F4800
Cheers for your help on this one, when it's ready it'll save me sooo much faffing around 
Good point. I couldn't fathom why the offsets would be negative, but now I see your point. You are using the custom box to account for "offset end stops" or others may have a "wipe zone" that needs to be accounted for. I'm curious if the max values for x and y are actually correct with the offsets. I assume they are because you are setting a higher max value then your actual bed dimensions in the custom box area?
Setting the min values to 0 would definitely be an option, that's how the non-custom bounding box option works now, but then that would break for people that have a positive shift in their custom bounding box options.
Maybe a better overall solution would be to split the offsets all around and allow for negative values? This would then translate to the following and allow for the values to be increased/decreased independently of each other.
min_x + min_x_offset
min_y + min_y_offset
max_x - max_x_offset
max_y - max_y_offset
& stick that section into the preferences, as it doesn't need to be touched again.
Either that, or it may be best to allow each corner location to be specifically set in the preferences with an "x,y" field (& thus no calculations), i.e.
Front_Left = "15,15"
Front_Right = "170,15" etc, etc
Whilst it's a bit of a pain to set it manually to begin with, it does mean that everyone can get their settings right for their specific printer, with zero complicated maths on your part to calculate every possible variation!
Edit: Keep it Simple! On thinking about it more, allowing users to explicitly enter in the preferences where they want to do each of the 4 corners seems like a really good idea, as everyone has slightly different setups & trying to code for every eventuality would be a nightmare, but allowing each user to enter their own specific settings ought to nicely simplify things for you on the code front - thus making it far easier to maintain...
Thinking about it, you could probably add a checkbox next to each field in the preferences titled "Display in wizard screen" (or suchlike), which enables/disables showing it in the " Bed Leveling Wizard " box on the main screen. (whilst I'm at it, I'm sure that "Leveling" has two L's, i.e. "Levelling")
Custom co-ordinates has already been proposed as a future update
It was found in the original bed leveling wizard.
Go read the entire thread.
There's a pic of custom co-ordinates in the GUI window I posted.
Here's it again
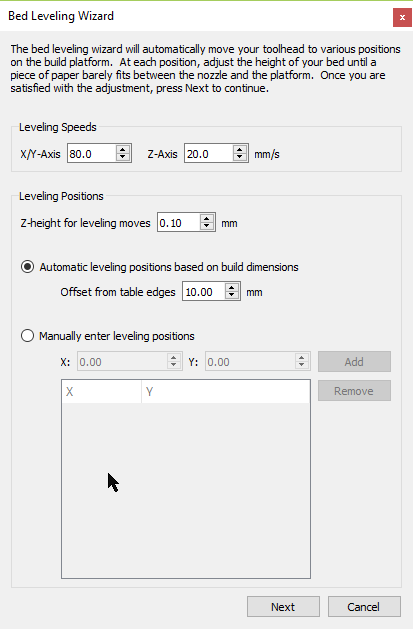
I think custom co-ordinates will definitely solve your problem
Levelling (British English)
Leveling (American English)
https://en.wikipedia.org/wiki/Levelling
Yeah, you're right @justinsb, the custom points will resolve this and is something planned for the next version, which I will probably be working on this weekend. So I will leave it as is for now and once that version is released you'll be all set.
1 Like
There's a lot of info here and sorry if I missed this plugin already being discussed...
I used to switch back and forth from my Pi to my laptop so that I could bed level with S3D. Then I realized that in Bed Leveling Plugin (2.1.0) I could set the parameters of what locations I wanted to do the leveling. I like to use 100x100, 200x100, 100x200, and 200x200, but it's simple to change to whatever best fits your next print.
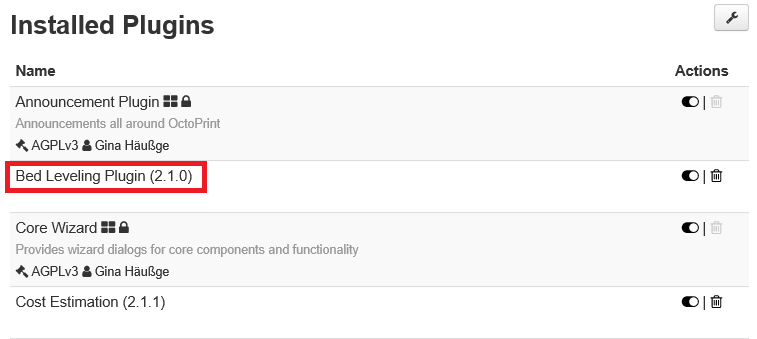
Where did you install the plugin from? The version you have installed is not the one I programmed.
Oh, think I found it over here.
Looks like the main difference is that that one has custom points, heat up paramaters,doesn't automatically home, and doesn't have the wizard aspect that this one has, unless I'm missing that part.
Hey jjneilliii,
So I didn't use the plugin for a while after I installed it because I didn't look at the settings to see if you could put in your own locations. It's been through several updates since I installed it so I'm not sure if that feature was there when I originally installed it or not.
I have gotten used to Homing prior to using it. It's not that big of a deal that there isn't an Auto Home.
A few months ago, I configured a set of buttons to do this job, using the "Terminal Commands" plugin.
The first button homes all three axes, and the other three raise the Z axis, travel to the next corner and lower the Z by the same amount it lifted.
So the procedure is to click the buttons one after the other.
Sure, it isn't a wizard, but I like it, and it's a good workaround until something better comes along.
1 Like
Having design/installed a method of adjusting the height of each corner, as combined with this plugin, it's a brilliant solution for me. I'm now printing maximum-sized parts without curling nor 1st-layer adhesion problems.
I haven't yet, primarily because the printer I use Octoprint on does not have finger-adjustable bed height screws. The screws are cap screws requiring an allen key to adjust, and are underneath the bed heater. To adjust, I cycle through my positions and measure the height from the hotend mount to the bed, writing each one down, then lifting the bed out and making adjustments. It's a three-point suspension on the bed, so I usually require a few iterations. I do plan on adding finger-adjustable screws soon.
I have just downloaded the wizard and will give it a try.
Are you still planning on adding custom co-ordinates?
What is the status off that feature?
Feels like this plugin is not quite complete until
until it gets custom co-ordinates