 I had something similar before .. just uninstalling and installing plugin pulled from my local box ... anyhow with 7-10" screen I'd maybe even allow X to start .. here's the whole idea to make it fit 320x240 ( https://www.aliexpress.com/item/TFT-2-8-Inch-320-x-240-Touch-Shield-LCD-Display-Module-For-Raspberry-Pi/32947028325.html ) and give basic info and basic functionality to be there instead of the lcd on the printer that I'm missing ... after that's done I need to make single panel to control all printers but for that I think I'll use a tablet and I think I seen a commercial app for android that does that so no need to make it myself (of course if not satisfying I'll make it myself
  )
)
Yeah... that was my earlier rig, essentially, albeit from Adafruit. It was a pricier version than yours. They have good tutorials, from what I've noticed.
I thought long and hard about the X11 decision for this one. I've done that before for the TouchUI review. I decided that I wanted to forego the Desktop system for the sake of performance and memory. (And yet, I routinely monitor everything on my production printer which includes Conky/X11 and there is a hit in performance as a result. X is heavy.) On the plus side, you can then VNC into it, though. This makes it easier to do screencaps of the interface for the sake of documentation rather than photography (which is nearly impossible given the glare/reflections).
I first got the one from adafruit before I found this one on ali ... same display, bit different pcb ... the problem is I'm trying to get them to work on orangepi .. something with armbian is not sitting here ... I did have to "enable" it on rpi too but looks like enabling it on armbian is getting to be a problem ... maybe "dtoverlay=pitft28-resistive:rotate=90,speed=32000000,fps=20" is the part I need to convert to armbian but not sure why when ft_ili9340 should just work out of the box .. but .. I'll solve it .. just takes time
as for screencaps, it's not hard to make a foto .. 3d print a small funnel between your screen and your camera, use low iso (100) small aperture (F/8 or smaller, maybe F/16 depends what lens you have) and long exposure time on the static image and you'll get perfect images. I have somewhere my old righ for taking screenshots of my tektronix 7104, it works pretty much the same and works flawlesly... only now with 3d printer you can design a very good shroud 
You probably want to read this.
Shroud? You mean "add another project on top of my stack"? Nay, sir. :laugh:
well shroud is 10min to design and bit longer to print but it's a "complete task in no time" from start to 100% .. and you get to easily take a screenshot ... that link is for rpi, as I said it works on rpi without a problem, orangepi is different beast
Yeah... but (regarding the link), the goal is to re-align the touch portion of the device to coincide with the rotated display portion of the device. So, add some combination of ,touch-swapxy,touch-invy to yours.
My complaint is that many of the tutorials out there fail. They deliver a rotated display but not a working touch screen. They then copy/recopy the same advice to basically "fix this at the X11 configuration level". Personally, I think the thing should behave before X11 starts up (optionally).
You make a point on the shroud. It's entirely possible to concoct something using black cloth, however. (Think of a truncated pyramid shape.) It would be a lot like those antique camera obscuras with the paper baffles.
I'm using tslib, it solves all the problems
exactly truncated pyramid is what I'm talking about but you can go with even simpler solutions
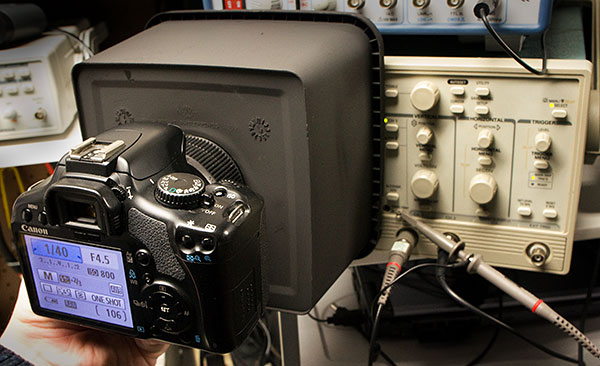
depending what you want to take pic with, if you wanna use a cell phone it's simpler but you can do dslr too, measure how close (far) you can be to get a whole lcd in the viewframe and in focus and make pyramid, bottom a/b to fit the screen, top a/b to fit the foto sensor, camera lens, whatever you use and there you have it .. print in black abs/pla, light sand inside, add alu tape on the outside .. will work like a charm ... I have two made like that but from cardboard for my 7613 and 1704 and works like a charm, haven't used them in ages, mso's took over as main tools now but the system works, and with 3d printer it's rather simple to make it work
I was thinking in terms of a truncated cone shape of fabric with embedded stretch cord at both openings. For the 10" screen I'm working on now, I'd calculate the circumference of the screen in inches, subtract two from that and this is then the cord length. A similar approach for the lens side. Since the display isn't yet embedded into the printer, this ought to work. Maybe speaker fabric...
So basically, if you use a stretchy fabric then you could then just pull back until it's not obscuring the view (or "pyramid of perspective").
stretchy fabric lets in light, you'd have to go with multiple layers or take pics in dark room .. cardboard (if you don't want to print the whole thing) is much easier to work with and can easily be made non transparent ... but yes, you can even just cover yourself, camera and screen with a "blanket" and it will work so a simple thick black fabric tube will work with two stretch cords on either end... depends how many of those images you plan to make .. as I was more thinking about some "stand alone" fixture with attached camera/phone operated remotely.. cardboard or polystyrene boards are my choice for such builds
I also like the "sturdy" design as I like to take pics of screens using long exposure and you can't do that from hand